
mailsforsahan@gmail.com
© 2024 sahan. All Rights Reserved - Website powered by AWS Lightsail
Call Me!AWS Networking
Introduction
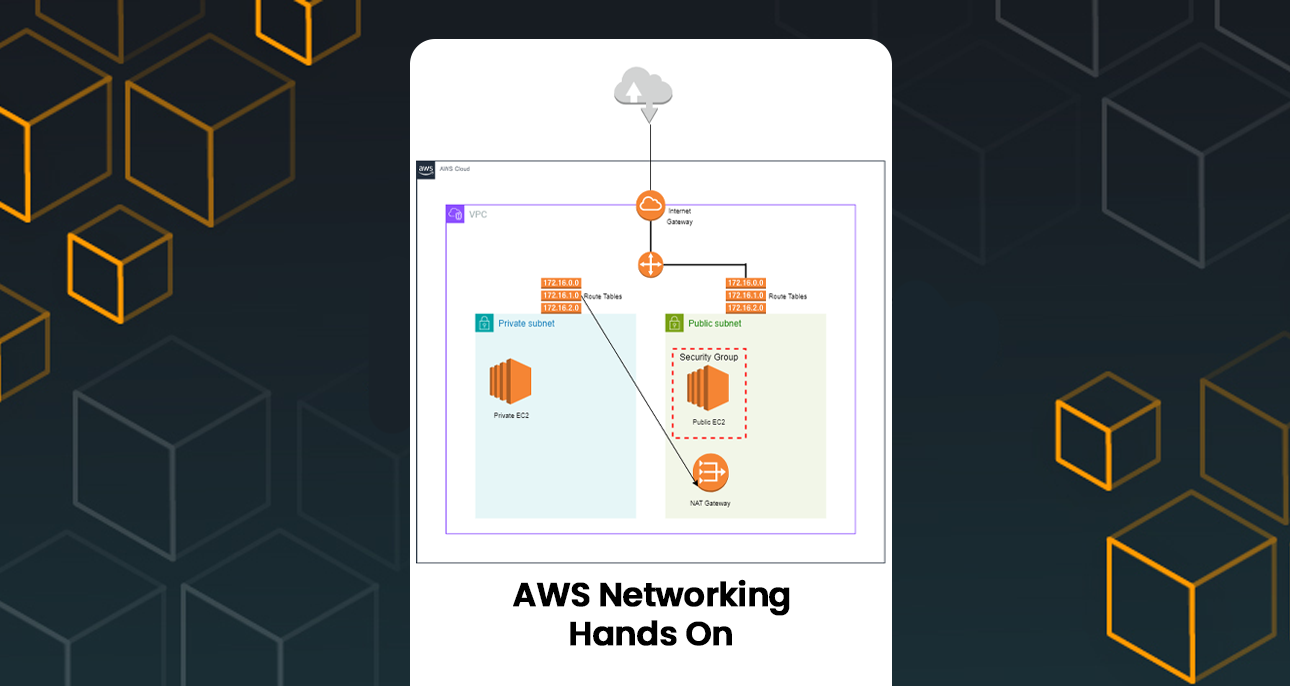
Virtual Private Cloud (VPC) with both public and private subnets is a fundamental task that forms the backbone of your cloud infrastructure. This setup not only ensures a secure and isolated network environment but also enables efficient management of resources, scalability, and cost optimization. In this blog post, I will walk you through the steps I took to create a VPC, set up subnets, launch EC2 instances, and configure route tables for seamless connectivity. The accompanying diagram will provide a visual representation of the network architecture.
Importance of Creating a VPC and Subnets
A VPC is a virtual network dedicated to your AWS account, where you can launch AWS resources in a logically isolated section of the AWS Cloud. Creating a VPC allows you to have complete control over your network configuration, including selection of your own IP address range, creation of subnets, and configuration of route tables and gateways. By setting up public and private subnets, you can isolate resources based on their accessibility requirements and security needs. This segregation helps in:
- Enhanced Security: Private subnets ensure that sensitive resources like databases and internal services are not directly exposed to the internet.
- Optimized Traffic Management: Public subnets are used for resources that need to interact with the internet, such as web servers, while private subnets can host backend services.
- Scalability and Flexibility: This architecture allows you to scale resources independently and manage them efficiently based on traffic and workload requirements.
Step 01 – Create VPC

Step 02
Created two subnets in London region.
Using these two subnets, One is public available and the private subnet is not available for public use.

Step 03
Created two EC2 Instances one in Public subnet and the other EC2 in Private subnet.
While creating the subnet, in the network settings, I have selected the VPC and Subnet type.
Note – when creating the private subnet, it is important to disable public IP.

Step 04 – Creating NAT Gateway
Once the subnets are created, we have to create NAT Gateway to access Internet.

Step 05 – Crating Route tables
When creating the link between subnets and the internet, we have to create Route tables to access the subnets
We have to create seperate route tables based on the subnets.

Step 06
Now, public Instance can be access using instance connect but if we need to connect private subnet instance we cannot directly connect using SSH. For this, we have to use public Instance connect and use keypair to access private SSH.
I used Putty to connect the instance locally.
Step 01 – Downloaded keypair of my instance and load the .pem file to Putty Key Generator and converted to .ppk file formate
Step 02 – I mentioned public instance IP into host name and in the connection, SSH, I selected the .ppk file and saved.
Step 03 – Once the instance is saved I selected the session and load. Once I loda the session, the user name we have to select is ec2-user.


Step 07 (upload keypair into public instance root)
Once local access is granted, I have to upload keypair into public domain and from that we can access private subnet instance to download required files.
Note – we cannot access the private subnet instance because public IP is disabled when the instance was created.
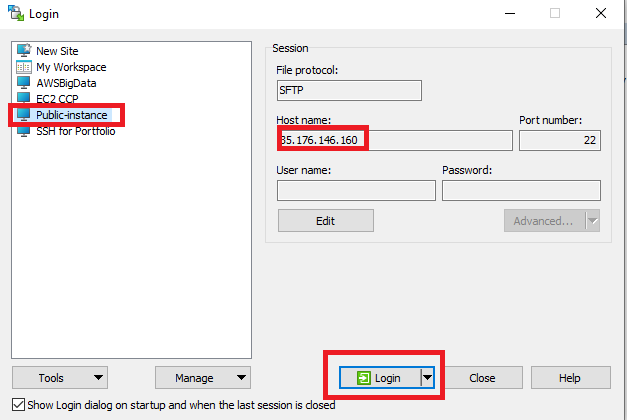
To upload the file to public instance, I used WinSCP and connect to putty with saved session. once we select the session
Once this is connected, we have to upload the keypair to root and use these commands.
Step 8:
Step 01 – First we have to use (ls) command in the terminal and see whether the file is uploaded into the root destination of public instance.
Step 02 – chmod 600 demo-keypair.pem. I used this command because I had to set the permissions
Step 03 -pscp -i C:\Users\YourUsername\Desktop\demo-keypair.ppk C:\Users\YourUsername\Desktop\demo-keypair.pem ec2-user@35.176.146.160:/home/ec2-user/
For the Ip, we have to use private instance IP address to access using the public instance
Now the Private instance is connected using public SSH connect

Step 9: (NAT Gateway inside public Subnet)
Even if the private instance is connected using public instance, private instance cannot use internet until the NAT Gateway is connected with private instance.
Note- When creating the NAT Gateway, we have to create Elastic IP. also, we have to create. NAT Gateway is created inside the public domain and connected with private route table. This is done because, no direct connection is enable to private subnet.

Conclusion
With these steps, we’ve successfully created a VPC with both public and private subnets, launched EC2 instances in each subnet, and configured route tables for proper network traffic flow. The public subnet has direct access to the internet through an Internet Gateway, while the private subnet uses a NAT Gateway in the public subnet for outbound internet access. This setup ensures that our private resources remain secure while still being able to communicate with the outside world when necessary.
By setting up this architecture, we achieve a robust and secure network design that optimizes resource management and enhances scalability. This guide should provide a solid foundation for anyone looking to set up a VPC with public and private subnets on AWS. Happy networking!